
Last Updated: October 30, 2026
Quick Summary
To inspect house siding, walk slowly around all four sides and check the lower courses, corners, openings, and eaves for cracks, warping, loose panels, and water staining. Inspect twice a year, in spring and fall, and photograph anything unusual so you can compare it later.
- Inspect house siding twice a year, once in spring and once in fall.
- Never lean a ladder against vinyl or aluminum siding; use stabilizers or a wall-standoff device.
- Keep at least 10 feet from overhead power lines during your inspection.
- Gently push the bottom edge of each vinyl panel upward; one that lifts easily is loose.
Table of Contents
- Why Regular Siding Inspections Protect Your Home
- Safety Tips Before You Start Your Siding Inspection
- Siding Inspection Checklist: A Systematic Walkthrough
- How to Inspect Vinyl Siding for Cracks, Warping and Loose Panels
- Checking for Water Damage Behind Siding
- Signs Siding Needs to Be Replaced Instead of Repaired
- Documenting Damage and Scheduling Your Next Step
- Frequently Asked Questions
Why Regular Siding Inspections Protect Your Home
Siding is your home’s first line of defense against rain, wind, snow, and sun. When it fails, water gets behind it, and that is where expensive problems start.
Regular inspections catch these problems while they are still small.
Many homeowners assume siding only needs attention when it looks bad. That is a costly mistake. Water damage often hides behind siding that still looks fine from the street.
- Catch small cracks before water reaches the wall
- Spot loose panels before wind tears them off
- Find moisture problems before mold forms
- Keep a dated record for insurance purposes
Safety Tips Before You Start Your Siding Inspection
Inspecting siding is simple, but it involves ladders, uneven ground, and sometimes power lines. Take a few minutes to plan before you inspect house siding from any ladder.
Watch out: never lean a ladder against vinyl or aluminum siding, since the panels can crack or bend under the load.
- Check the ground for soft spots, holes, or slopes before setting up a ladder
- Keep at least 10 feet from overhead power lines
- Wear non-slip shoes and work gloves
- Never inspect in wet, icy, or windy conditions
If you need to go above the first story, consider hiring a professional.
Siding Inspection Checklist: A Systematic Walkthrough
A systematic walk keeps you from missing spots. Start at one corner of the house and move in one direction, working around all four sides. Look at each section from a few feet away first, then up close.
On a typical single-family home, most of your time will go to these areas:
- Lower courses of siding, near the ground and splash zone
- Corners, where panels meet and joints open up
- Around windows, doors, and vents
- Under eaves and near gutters
Walk slowly. Many problems show up only at an angle, when light hits the surface and reveals warping or dents. Take photos of anything unusual so you can compare later.
The areas that need the most attention during a siding inspection are these:
| Area | Why it matters | Where to look |
|---|---|---|
| Lower courses of siding | Near the ground and splash zone | Bottom of the walls |
| Corners | Panels meet and joints open up | Inside and outside corners |
| Around windows, doors, and vents | Openings where damage often starts | Edges of each opening |
| Under eaves and near gutters | Water collects and runs here | Beneath the roofline |
| Storm-facing sides | Take the brunt of weather | Often the west or south side in many areas |
How to Inspect Vinyl Siding for Cracks, Warping and Loose Panels
Vinyl is the most common siding material, and it hides damage well. Look for these specific signs:
- Cracks: Small hairline cracks often start at nail holes or near corners. Gently press the panel. If it flexes and cracks, it needs replacement.
- Warping: Panels that bow or wave often took heat damage or were installed too tight. Check whether the warp is near a heat source like a grill or sunny wall.
- Loose panels: Gently push the bottom edge of each panel upward. A panel that lifts easily or rattles is no longer locked into the one below it.
- Faded or chalky surface: Years of sun can weaken vinyl. Rub a white cloth across the surface. If it comes away colored, the material is breaking down.
A common mistake is ignoring a single loose panel. Wind works on it every storm, and it can pull neighboring panels loose too.
Checking for Water Damage Behind Siding
Most serious siding damage is hidden. Water enters at a gap, crack, or failed caulk joint, travels behind the siding, and soaks the sheathing and framing. The exterior may look fine for months. The goal of this part of the inspection is not just to spot stains, it is to separate cosmetic wear from active water intrusion, because the two call for very different responses.
Start with the exterior clues
Work the same directional walk you used for the visible-defect pass, and slow down at these locations:
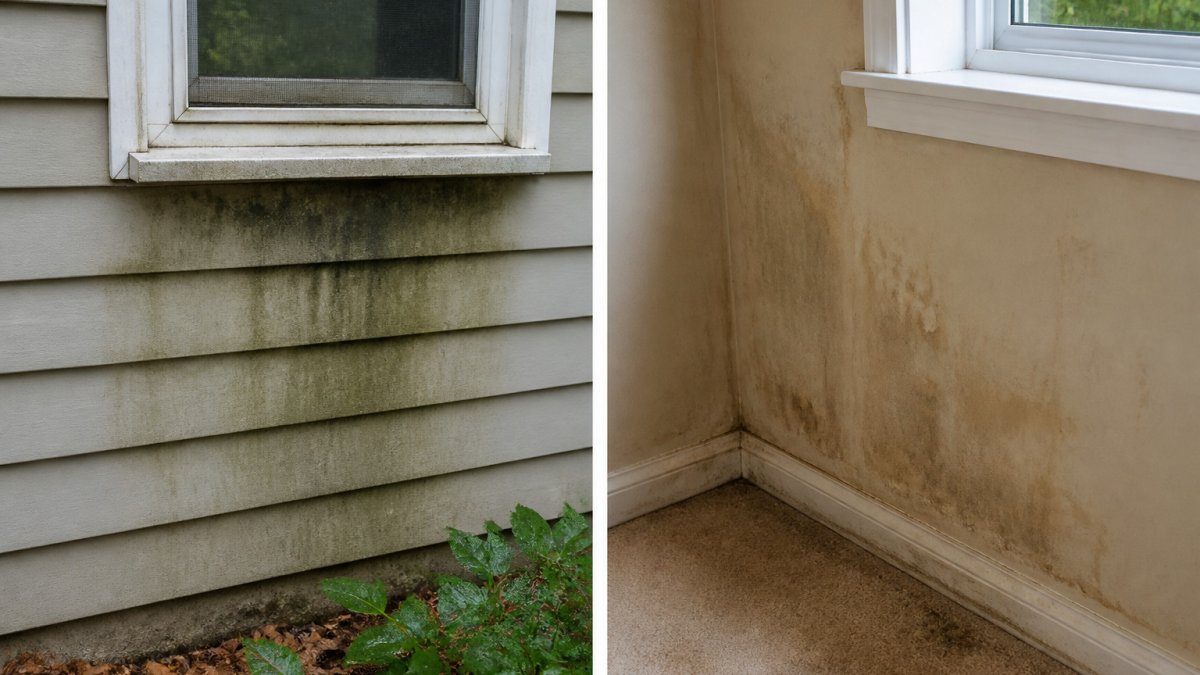
- Below windows and doors: look for dark streaks, efflorescence (white mineral deposits), or paint that has bubbled rather than simply faded.
- At inside and outside corners: joints open first, and water follows the gap.
- Along horizontal seams and trim boards: caulk that has pulled away, cracked, or turned chalky is a common entry point.
- At penetrations: hose bibs, dryer vents, light fixtures, and utility boxes are frequent leak paths because the flashing or sealant around them fails before the siding does.
- Near the base of the wall: staining, mud tubes, or soft trim at the bottom course often signals water running down behind the panels.
Corroborate from the inside
A stain on the exterior is a clue, not a diagnosis. Before you conclude there is hidden damage, check the interior side of the same wall:
- Look for water stains, bubbling paint, or a chalky ring on drywall or plaster on the wall that backs the suspect exterior area.
- Press gently along the baseboard and lower wall with a screwdriver handle or your knuckle. Softness, give, or a hollow crunch is a red flag.
- Check ceilings and floor joists in a basement or crawlspace directly below the suspect wall for staining, sagging, or musty odor.
- Smell for mustiness near outlets and along the bottom plate; a persistent damp smell with no visible stain still warrants a closer look.
A common pattern is exterior staining with no interior sign yet, that is early-stage and worth monitoring and sealing. Exterior staining plus interior staining or softness means water has been traveling for a while and hidden damage is likely.
If you find soft sheathing, active moisture, or mold, stop probing. Poking a screwdriver into soft wood can enlarge the opening and let in more water. Photograph what you see and get a professional evaluation before doing anything else.
Distinguish cosmetic from structural
Not every blemish means intrusion. Fading, chalking, and minor surface scuffs are cosmetic. Cracks that run through the panel, gaps at seams and trim, rusted fasteners, and any interior corroboration point to water getting behind the cladding. When in doubt, treat it as intrusion until a moisture meter or a professional inspection says otherwise, the cost of a false alarm is far lower than the cost of rotted sheathing.
Signs Siding Needs to Be Replaced Instead of Repaired
Repair works for small, isolated problems. Replacement makes sense when damage is widespread, recurring, or has reached the structure behind the cladding. The useful question is not “repair or replace?” in the abstract, it is how urgent the problem is and what the next step should be.
Triage findings into three tiers
After your walkthrough, sort every finding into one of three buckets. This keeps a single loose panel from getting the same response as a wall of soft sheathing.
Monitor (cosmetic or early-stage):
- Fading, chalking, or minor surface scuffs
- A single hairline crack that does not flex when pressed
- Caulk that is chalky but still adhered
- A loose panel that reseats and stays put
Recheck these after the next storm or at the next seasonal inspection. Note the date and location so you can tell whether it is spreading.
Repair promptly (localized, active):
- One or two cracked or warped panels
- A failed caulk joint or a small gap at trim
- A single loose panel that will not stay locked
- Localized staining with no interior corroboration
These are worth fixing within a few weeks, before the next weather cycle works the opening wider.
Urgent professional assessment (likely hidden damage):
- Soft spots in siding or trim when pressed
- Rot that reaches the sheathing underneath
- Interior staining, softness, or musty odor on the same wall
- Repeated water intrusion in the same spot after a repair
- Damage covering more than a quarter of one wall
A practical rule: if the same spot has needed repair twice, or if any interior sign backs up an exterior clue, stop patching and get a professional evaluation. Repeated repairs at one location usually mean the water source was never fixed.
When replacement beats repeated repair
Patching the same section again and again costs more over time than one proper replacement, and it rarely solves the underlying problem. Replacement is the better path when damage is widespread, when panels are brittle or no longer match after repair, or when rot has reached the framing. Compare siding color options to plan the look of a full replacement. A professional can help you weigh repair against replacement using the actual condition of the sheathing and flashing, not just the surface appearance. Find and vet local siding contractors to get that evaluation.
Document before you decide
Whichever tier a finding lands in, photograph it from a few angles, a close-up and a wider shot that shows its location on the house, and write a short note with the date. If storm damage is involved, document it before any cleanup; insurance claims go more smoothly with clear evidence. A dated record also lets you show a contractor or home inspector exactly what changed and when.
Documenting Damage and Scheduling Your Next Step
Good records make every next step easier. Take dated photos of each problem area from a few angles, including a close-up and a wider shot that shows its location on the house.
If storm damage is involved, document it right away, before any cleanup, since clear evidence helps with insurance claims. Learn how to file a storm damage insurance claim once your records are complete.
Once you know what needs attention, you have a few clear options:
- Make a quick repair for a single loose or cracked panel
- Schedule a professional inspection for hidden water damage
- Get a no-obligation estimate for a larger repair or replacement
- Contact EFER Renovations Inc. for emergency repairs, available 24/7
For homeowners in New Jersey and Eastern Pennsylvania, EFER Renovations Inc. offers no-obligation estimates and a 10-year workmanship warranty. Contact us today to schedule your inspection.
Frequently Asked Questions
How do you tell when siding needs to be replaced?
Siding usually needs replacement when damage is widespread rather than isolated. Look for panels that are cracked or warped across several areas, soft or spongy spots when you press on wood or fiber-cement boards, paint that is chalking or peeling in many places, and gaps or separated seams that repairs will not fix. If you find moisture or rot behind the siding, or if repairs would cost a large share of a replacement, a full replacement is often the better long-term choice. A professional evaluation can confirm the decision.
Can damaged siding be repaired, or does it need to be replaced?
Isolated damage is often repairable. A single cracked vinyl panel can be unlocked, removed and replaced, and small holes or split boards can be patched or replaced individually. Damage that is spread across many panels, involves rot in the sheathing, or comes from poor installation usually calls for replacement of the affected sections or the whole wall. Matching color and profile on older siding can also be difficult, which may push a homeowner toward a larger replacement job.
Do home inspectors look at siding?
Yes. Siding and other exterior components are typically part of a standard home inspection in the United States, which covers visible defects, signs of moisture intrusion, and the condition of trim, flashing and caulk. A home inspector is not usually able to see behind the siding without removing it, so hidden water damage may only be suspected. If you find signs of a problem during your own inspection, a licensed contractor or inspector can take a closer look.
How often should you inspect house siding?
Most homeowners should do a visual siding inspection at least twice a year, once in spring after winter weather and once in fall before cold weather arrives. Also check after major storms, hail, or high winds. Seasonal timing matters because freeze-thaw cycles, heavy rain and UV exposure all stress siding. A quick walk around the house every few months, combined with a thorough inspection each spring and fall, catches most problems early and keeps repair costs lower.
