
Table of Contents
- What to Do When Your Roof Is Leaking: First Steps
- How to Tarp a Roof Safely After Storm Damage
- Temporary Roof Leak Repair Methods That Work
- How Long Can You Wait to Repair a Roof Leak?
- How to Find the Source of a Leaking Roof
- Documenting Storm Damage for Insurance Claims
- When to Call a Professional for Emergency Roof Repair
- Frequently Asked Questions
Last Updated: October 7, 2026
What to Do When Your Roof Is Leaking: First Steps
When a storm tears through and water starts dripping inside, knowing how to temporarily fix a leaking roof after storm damage can save you thousands in repairs. The first hour matters most. Homeowners who act fast prevent the worst damage.
Here’s what to do right now.
Safety First: Electrical and Structural Hazards
Water and electricity don’t mix. Before you touch anything, check for these dangers:
- Buzzing or sparking outlets near the leak: cut power at the breaker
- Sagging ceilings: stay out of that room entirely
- Standing water near electrical panels: call an electrician first
- Loose or hanging debris on the roof: never go up during active weather
The Occupational Safety and Health Administration’s ladder safety guidance reminds homeowners that falls are the leading cause of storm-related injuries. If the roof is steep, wet, or damaged, stay off it.
Contain the Water Indoors
You can slow the damage without climbing anything. Grab buckets, towels, and plastic sheeting. Move furniture and electronics away from the drip zone. If water is pooling in a sagging ceiling, poke a small hole at the lowest point to drain it into a bucket. This sounds counterintuitive, but a controlled drain beats a ceiling collapse.
Never ignore a bulging ceiling. The drywall can hold several gallons before it fails. When it goes, it releases all at once and can cause injury or destroy everything below.
How to Tarp a Roof Safely After Storm Damage
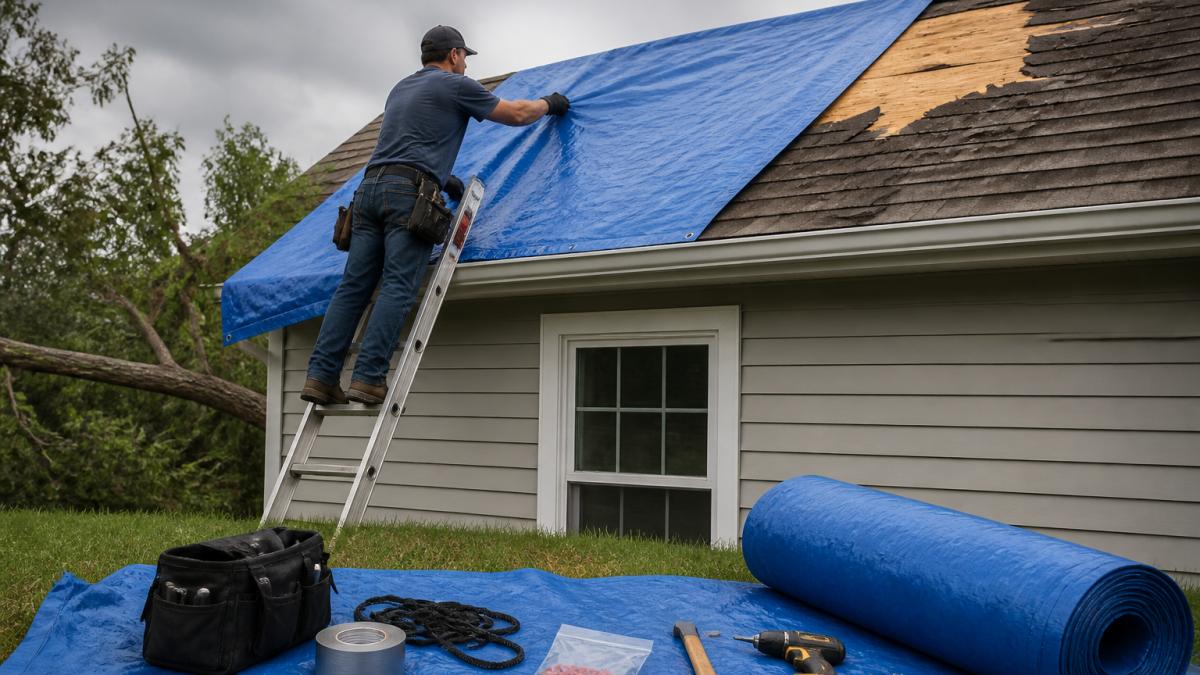
Tarping is the fastest way to stop water intrusion when you can’t get a permanent repair done immediately. A properly secured tarp can hold for weeks, but only if you install it right. The single most common failure is a tarp that starts below the ridge, water simply creeps under the top edge and the leak continues.
First, Decide Whether You Should Be on the Roof at All
Before you gather a single tool, run this check. If any of these are true, stay off the roof and call a professional:
- The roof pitch is steep enough that you can’t stand comfortably on it dry
- Shingles, sheathing, or flashing are visibly loose, cracked, or missing
- The surface is wet, icy, or covered in debris
- You’d be working near a power drop, mast, or satellite dish
- You have no one on the ground to spot you and call for help
The Occupational Safety and Health Administration’s ladder safety guidance notes that falls are the leading cause of storm-related injuries, and most of those happen on wet or damaged surfaces. A tarp you can’t install safely is not worth a fall.
Materials You’ll Need
Gather these before you climb:
- Heavy-duty polyethylene tarp (at least 6 mil thick; 10 mil holds up better in wind)
- 2×4 lumber boards for weighting edges
- Roofing nails or cap nails with plastic or metal washers
- Hammer or nail gun
- Rope or bungee cords
- Work gloves and non-slip boots
Step-by-Step Tarp Installation
- Wait for calm weather. Never tarp during rain or high wind. Wind can turn a loose tarp into a sail and pull you off balance.
- Position the tarp so it overlaps the peak by at least 3 feet. This is the step most homeowners skip, and it’s the one that determines whether the tarp works.
- Drape it down past the leak point and over the eaves, so water sheds clear of the wall.
- Secure the top edge with 2×4 boards nailed through the tarp, or with cap nails spaced roughly every 12 to 18 inches along the ridge.
- Add weights along the sides to prevent wind lift. Sandbags, lumber, or filled buckets work; don’t rely on the tarp’s own weight.
- Check for gaps where water could sneak underneath, especially at valleys, vents, and chimneys.
Run the tarp over the ridge line, not just over the damaged area. Water travels downhill, and a tarp that starts below the peak lets water creep under the top edge.
What a Tarp Won’t Fix
A tarp is a water-shedding layer, not a seal. It won’t stop water that’s entering through a chimney, a vent boot, or a wall flashing, because those paths run under the tarp. If water is still dripping after a correctly installed tarp, the entry point is almost certainly at a penetration rather than an open field of shingles, and that’s a job for a roofer, not another layer of plastic.
Temporary Roof Leak Repair Methods That Work
Once the rain stops, you can move from tarping to targeted temporary roof leak repair. Two methods work best for most storm damage.
Roofing Cement and Sealants
Roofing cement bonds to most roofing materials, including asphalt shingles and metal. Clean the area first, then apply a thick layer over cracks, nail holes, or small punctures. Let it cure according to the label. This works well for flat surfaces but fails on active leaks where water is still flowing.
Butyl Tape and Peel-and-Stick Patches
Butyl tape is a thick, sticky strip that seals around flashing, vents, and seams. Peel-and-stick patches work the same way. Press them firmly into place and smooth out air bubbles. These are faster than cement and hold up better in cold weather.
| Method | Best For | Cure Time | Durability |
|---|---|---|---|
| Roofing cement | Cracks, nail holes, small punctures | Several hours | Moderate |
| Butyl tape | Flashing, seams, vents | Immediate | Good |
| Peel-and-stick patch | Flat surfaces, quick fixes | Immediate | Moderate |
| Tarp | Large damaged areas | Immediate | Weeks |
How Long Can You Wait to Repair a Roof Leak?
There’s no single answer, because the right timeline depends on how much water is coming in, what’s underneath it, and what the weather is doing. A slow drip into an unfinished attic is a different problem from a steady stream over a bedroom ceiling. Use this triage to decide how urgently you need to act.
Triage by Leak Severity
Active emergency, act now. Water is flowing steadily, pooling, or spreading across a ceiling or wall. You see sagging drywall, bulging paint, or water near outlets, fixtures, or the electrical panel. This is the case where you cut power to affected circuits, contain the water, and call a professional the same day. Do not wait for a convenient appointment.
Contained drip, act within 24 to 48 hours. Water is dripping slowly into a bucket or a contained area, and the ceiling above is firm and dry to the touch. You have a little breathing room, but not much. Mold can begin colonizing wet materials within 24 to 48 hours, so the goal is to stop the source and dry the area inside that window.
Hidden moisture, act within the week. There’s no visible drip, but you notice a musty odor, a faint stain spreading on a ceiling or wall, or damp insulation in the attic. This is the most commonly missed category. Water is already inside the assembly, and the damage is happening out of sight. A moisture meter or a roofer’s inspection can confirm it.
What Actually Drives the Timeline
Four factors move the clock faster or slower:
- Leak volume. A gallon an hour is an emergency; a cup a day is a watch item.
- Weather. If more rain is forecast, your window shrinks. A tarp buys time; a dry forecast buys more.
- Roof condition and age. An older roof with brittle shingles or soft decking deteriorates faster once water is in the system.
- Interior risk. Water over electronics, insulation, or finished ceilings is more urgent than water over a concrete floor.
The Damage Clock, Roughly
- First 24 hours: Water spreads through insulation and drywall; staining appears.
- First week: Mold colonies establish and wood begins to soften.
- First month: Rot weakens roof structure and rafters.
- Beyond a month: Repair costs climb fast, and roof replacement becomes likely.
The Environmental Protection Agency’s mold cleanup guidance notes that mold can trigger respiratory problems and allergic reactions. That’s a health issue, not just a property issue.
Don’t ask “how long can I wait?” Ask “how much water, over what, with what forecast?” The answer changes with each one.
How to Find the Source of a Leaking Roof
Leak detection is tricky because water rarely drips straight down. It travels along rafters and decking before finding an exit point. Here’s how to trace it:
- Go into the attic during or right after rain
- Look for dark streaks on the roof decking
- Check around chimneys, vents, and skylights for gaps in flashing
- Inspect valleys where two roof planes meet
- Feel for damp spots on insulation and rafters
Common leak sources include damaged flashing, missing shingles, cracked pipe boots, and clogged gutters that push water under the roof edge.
The drip you see inside is rarely directly below the actual leak. Always trace upward and follow the water path along framing.
Documenting Storm Damage for Insurance Claims
Insurance claims go smoother when you have clear documentation. Before you make temporary repairs, take these steps:
- Photograph everything from multiple angles, including close-ups
- Record video showing the leak in action if it’s still dripping
- Save receipts for tarps, materials, and any emergency services
- Write down dates and times of when damage occurred and when you noticed it
- Keep damaged materials until the adjuster sees them
Most policies require you to prevent further damage, so temporary repairs are usually covered. Keep your receipts and document everything you do.
When to Call a Professional for Emergency Roof Repair
Call a professional when any of these apply:
- The roof is steep, wet, or structurally unstable
- Water is near electrical wiring or panels
- The leak is widespread or you can’t find the source
- You see sagging, cracking, or missing sections
- Storm damage is severe enough to file a claim
EFER Renovations Inc. offers 24/7 emergency support and works directly with insurance companies to simplify the claims process. Our GAF, Owens Corning, and IKO certifications mean your repair meets manufacturer standards, backed by our 10-year workmanship warranty. We also offer a 10% discount for seniors and veterans.
Storm damage never waits for a convenient time. The longer water sits, the more damage it causes to your roof, ceilings, and structure. EFER Renovations Inc. brings 13 years of experience, 24/7 emergency response, and full insurance claims assistance to homeowners across New Jersey and Eastern Pennsylvania. With a 5.0 rating from 73 Google reviews and a 10-year workmanship warranty, we handle everything from temporary fixes to full roof replacement. Contact us today for a quick, no-obligation estimate.
Frequently Asked Questions
What should I do first when my roof starts leaking after a storm?
Move people and pets away from the leak, then cut power to affected areas if it’s safe to reach the breaker. Place buckets and towels to contain dripping water. Don’t go on the roof during rain or high winds. Once it’s safe, document the damage with photos and call a professional for emergency roof repair. EFER Renovations offers 24/7 support for storm-damaged roofs in New Jersey and Eastern Pennsylvania.
Can I temporarily patch a roof leak from inside the house?
Yes, for small drips you can use a temporary roof leak repair method like applying roofing cement or butyl tape from the attic side if you can safely access the leak area. This won’t stop water intrusion completely but can reduce interior damage. For larger leaks, tarping the roof from outside is more effective. Always prioritize safety and avoid standing on wet surfaces.
How long can you wait to repair a roof leak after a storm?
You should schedule permanent repairs as soon as possible, ideally within a few days to a week after the storm. Delaying can lead to mold growth, wood rot, and structural damage. Temporary fixes like tarps are meant to buy you time, not solve the problem. If you’re unsure how long you can wait, have a professional inspect the damage to assess urgency.
Is it safe to go on the roof after a storm?
Only go on the roof if it’s completely dry, winds are calm, and you have proper safety gear. Storm-damaged roofs can have weakened areas, and wet shingles are slippery. If you’re unsure, don’t risk it. Many roofing companies, including EFER Renovations, offer emergency tarping and inspections so you can stay safe while protecting your home.